This is my complete Guide on How to Sell on Amazon FBA for Beginners in 2024.
In this all-new Guild I will show you exactly how to build a 7 Figure Online Business that will give you financial freedom :
- How Does Amazon FBA Work
- How to Open an Amazon Seller Account
- How to Find a great Product Opportunity
- Where to Find Factories to Manufacture your Product
- Shipping and Importing Your Product
- How to Send your Product to the Amazon Warehouses
- New Product Launch Strategies for 2024
- Lots of Advanced Tips and Techniques
So if you want to Launch your Amazon Business in 2024, you’ll love today’s guide. Let’s learn How to Sell on Amazon!
Let’s Get Started.
Contents
Chapter 1:
How to Get Your Online Business Started
Is Selling on Amazon really a good business?
Yup!
In fact, online e-commerce businesses have 5 times higher success rates than traditional businesses.
The amount of money you need to start an Amazon business can be anything from $250 to $5000.
In this chapter i’ll show you all the different ways how to sell on Amazon FBA depending on your Goals and Budget.
Types of Amazon Businesses
Did you know there are several businesses models for selling on Amazon?
Depending on you where you want to source your products from, you can chose:
- Retail and Online Arbitrage
- Wholesale Arbitrage
- Private Label
Retail and Online Arbitrage
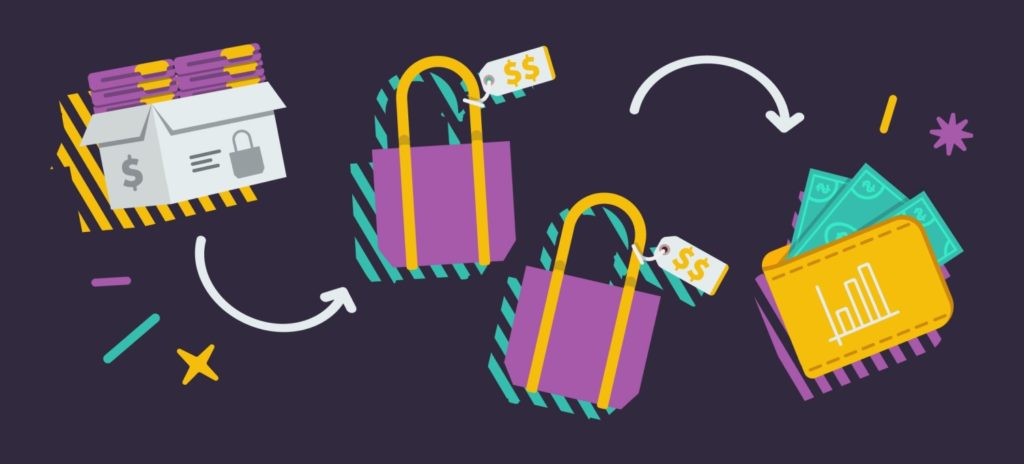
In this business model, you buy items that are on sale in retail or online stores like Walmart or Target and then resell them for a profit on Amazon.
This business model used to be very popular in the past, but due to the unpredictability of sales and lack of scalability, people have been moving away from it.
Wholesale Suppliers
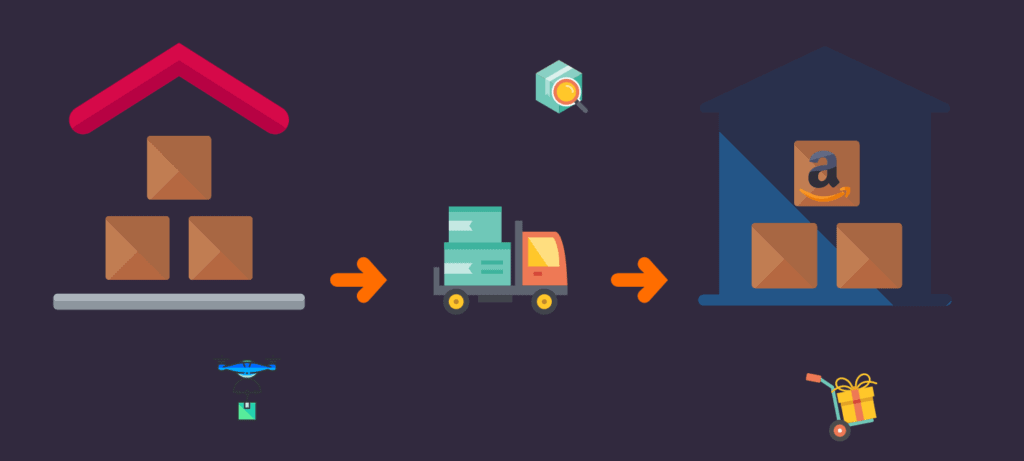
In this business model, you buy items from a wholeseller and become an authorized distributor of their products on Amazon.
This model can scale much better than retail arbitrage, but you are still dependent on your supplier and will have to compete with other sellers of the same product.
Your Own Private Label Brand
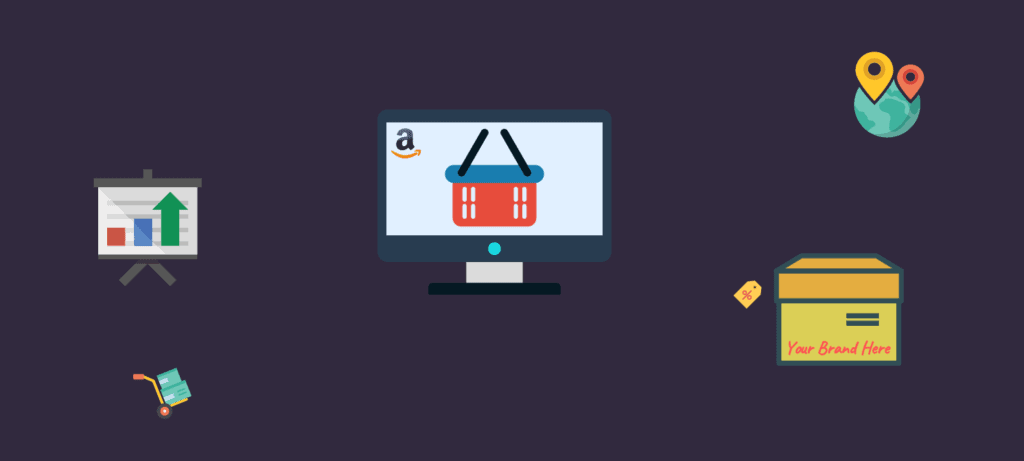
In this business business model, you use a factory that produces “White Label” products and sell them under the Brand you create.
This is, in my opinion, the best business model for selling on Amazon.
Not only you get to create your own Brand and Product Line, but in the process, you also create a high value asset that you can sell later for an amazing payday.
How much Money do you need to Sell on Amazon
The costs associated with selling on Amazon can be classified in a few categories:
- Inventory
- Shipping
- Initial Branding
- Subscriptions and Software
- Advertising
Inventory Cost
Inventory Cost can vary based on the products you are purchasing and the amount you want to bring on your first shipment. Products can cost a few cents or a few dollars to manufacture.
Plan to invest $200 to $1000. And remember, this is not an expense, this is an asset.
Shipping
Shipping can also vary based on where your products are manufactured and where you are trying to send them.
If for example you are making the product in China and shipping it to the US, you can chose air freight or sea freight. Air freight is much more expensive but also faster.
You product can arrive in a few days by air, as opposed to 2 weeks by sea.
If your product is small and light, air freight is the way to go. For larger and heavier products, consider sea freight as a better option.
If your shipment is less that $800, you don’t have to worry about import taxes. However, if your shipment value is more, then add 3-5% on average for Customs Duties.
Creating Your Brand
When establishing a brand, you will need to create a brand name, a logo and the product packaging.
You can chose to do it yourself using free online tools like Canva, or you can have someone do it for you on a website like Fiverr for 5-20 dollars.
Even if you are not great at graphic design, do not skip this step. Creating a brand is very important. Create what you can now and you can change it later.
Subscriptions and Software
When selling on Amazon, you will have to pay a monthly fee of $39.99 to use the Seller Central platform as a professional seller. There is also an Individual Account that charges a per sale fee of $0.99, but it is too limited and we don’t recommend it.
There are other, optional software you can use, such as:
- Jungle Scout is a great tool you can use to find products to sell.
- Seller Board is great tracking your sales numbers and profits.
- PPC Entourage is the tool we use for managing our Marketing Campaigns on Amazon.
- Helium 10 is another great tool widely used by the Amazon Sellers Community for Product Research, Keyword Research, Listing Optimization and Marketing.
You don’t absolutely need any of these tools in the beginning, but they will make your life much easier.
Here is a direct comparison between Helium 10 and Jungle Scout.
You can learn more about SellerBoard here.
Advertising
Advertising your products is optional, but highly recommended, especially when you first bring your product live to boost your ranking.
Amazon has a few internal advertising tools such as:
- PPC – Pay Per Click. Where your product is shown at the top of the page.
- Coupons – Where you offer a discount that gets featured on the “Deals of the Day” Page.
- Amazon Deals – Where you offer Limited Time Discounts to Amazon Customers.
Other Advertising platforms such as Facebook are also very useful. Amazon loves receiving external traffic, so if you advertise your product on Facebook and people visit your page, Amazon will reward you with higher ranking.
If you would like to advertise on Amazon using Pay Per Click campaigns, plan to spend about $1 to $5 a day.
Creating Your Amazon Account
Creating an Amazon Seller Account is a pretty straight forward process, but you have to be careful to enter your information correctly so it gets approved fast.
You will need:
- A Bank or Payoneer Account to make payments and get paid by Amazon.
- A Credit Card to setup as a Charge Method for your $39.99 subscription.
- A phone number – Mobile or Landline.
- You can create an account under your personal details or a Company.
- Documents to prove your identity and address: Passport, Drivers License, Bank Statement or Utility Bill.
- When applying, make sure the address matches on all documents and you type everything exactly the way they appear on your official ID. (ex: “100 Main ST.” and “100 Main Street” may seem the same, but Amazon will give your hard time for it.
Once you have everything ready, start the account creation process.
Step #1:
Go to the Amazon Seller Account Page and click Register.
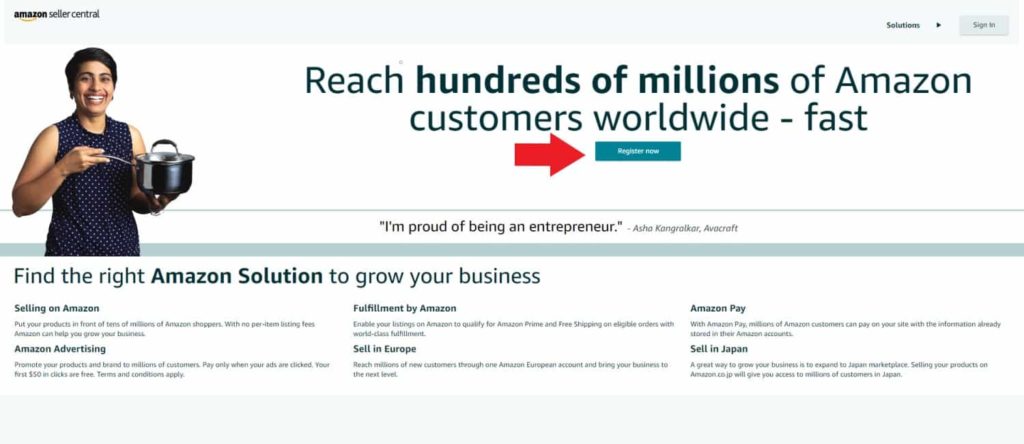
Step #2:
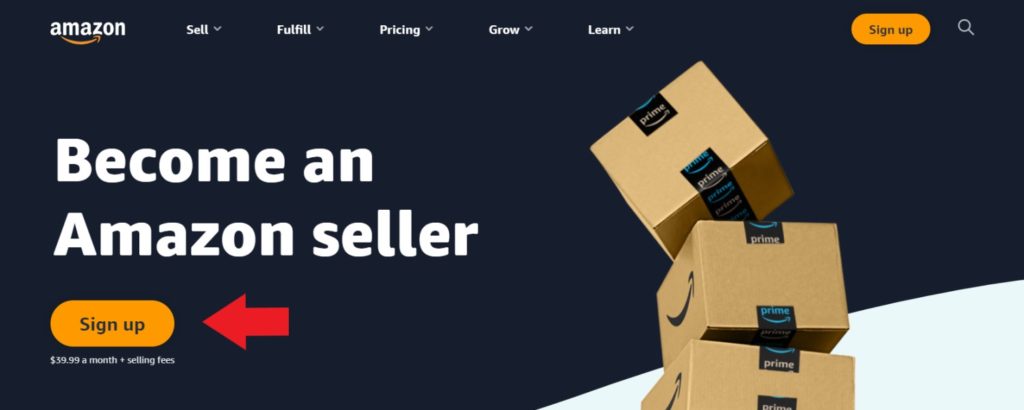
Click the Sign Up Button:
Step #3:
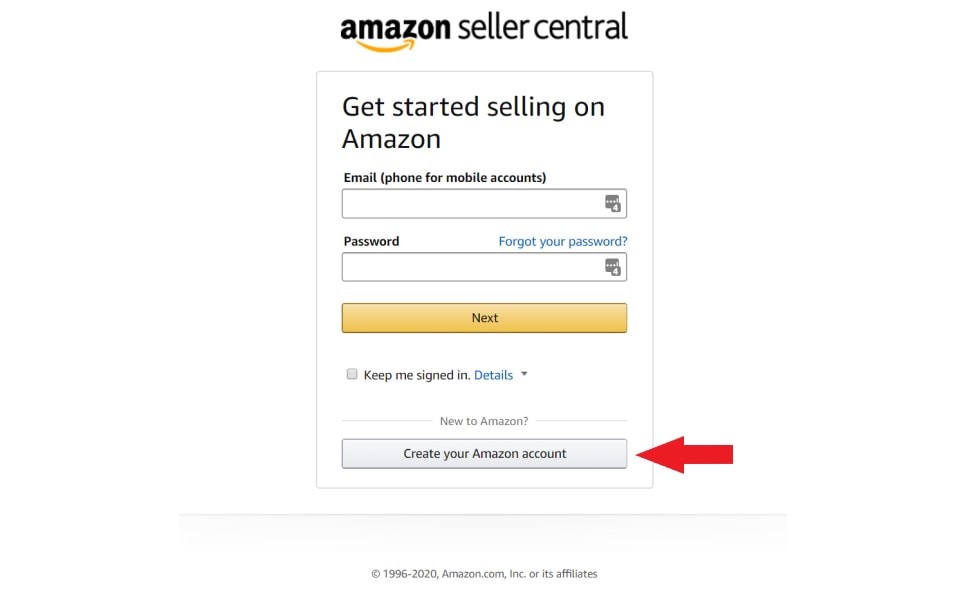
If you already have an Amazon Buyer Account and want to use the same login information, enter it and log in. If not, Create a new Account for Selling by Clicking “Create your Amazon Account“.
Then enter your Name, Email and a secure Password.
Step #4:
Go trough the account creation steps:
- First enter your Personal or Business Information: Name, Address, Phone Number.
- Then, select the Marketplace you will be Selling on (US, UK, DE etc.).
- On the next screen, you will be asked for your Billing Information. Enter your Credit Card here.
- On the next Step, you will need to enter your Store Name. This will be your Brand Name.
- And Finally, on the last page Amazon will ask you to confirm your identity by enter your ID or Passport Information and a Bank Statement.
Once your Information has been submitted, your account should be approved within 2 Business days.

Chapter 2:
Finding a Product that Sells Well all the Time
In order to be successful Selling on Amazon, we need a good product to sell of course.
But How do we Find it?
Most people will try to sell random products that they think are interesting, or create new products that don’t exist yet.
Kudos to you for being a visionary, but we need to create a profitable business first and then think about creating products we are passionate about.
Now that does not mean you should not chose a Nitch you are interested in, quite the opposite, that helps a lot.
So how do we find a profitable product?
We use Sales Figures and Market Analysis. Here’s how:
Understanding Amazon Product Tiers
Before we jump into looking for products, we should first understand the 2 main tiers of Products on Amazon:
- Standard Sized Items
- Oversize Items
The Size and Weight of your product will decide in which tier they go into and that makes a huge difference in profit numbers. Oversize items are more expensive to store and ship, so we recommend starting with standard sized items.
A standard-size item is one that, when fully packaged, weighs 20 lb or less and does not exceed:
- 18 inches on its longest side
- 14 inches on its median side
- 8 inches on its shortest side
Any item exceeding these dimensions is considered oversize.
Amazon FBA vs FBM
You probably heard these acronyms before, but what do they mean?
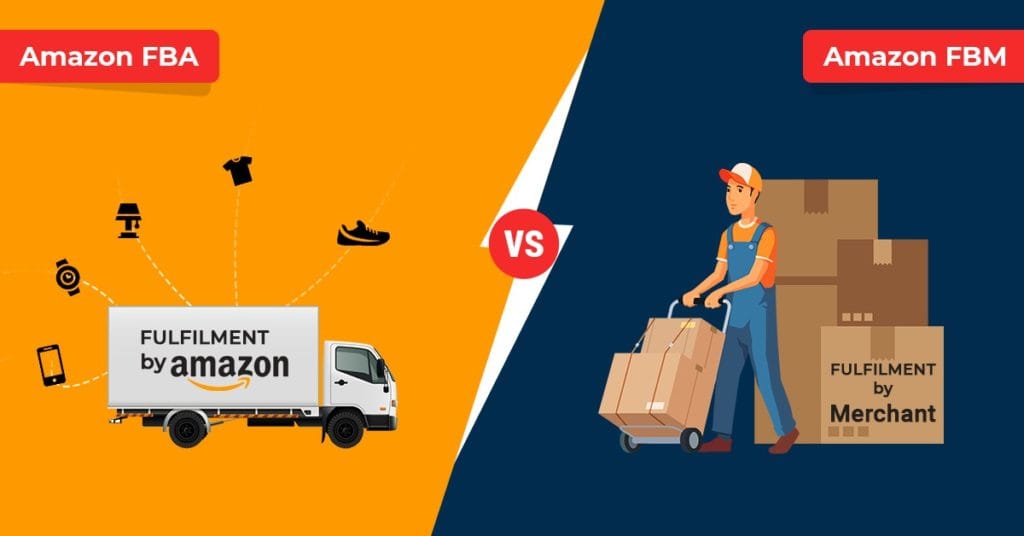
FBA – Fulfillment by Amazon means that you send your products in bulk to the Amazon Warehouses and they will store, pick, pack and ship them to the customers for you. They also handle taking payments and any customer service needed so you don’t have to do much. And most importantly, you get the Prime Badge.
Sounds amazing! What’s the catch? Well, there are some fees associated with this service. The good news is that because Amazon is so big, the shipping prices are super low and well worth it. Using this system will allow you to scale your business without needed to put in any more work.
You have to place an order with your supplier once a month or so, simply increase the order size and you are good. Same amount of work, but more and more profits. And that my freinds is the secret to how Amazon FBA Businesses grow to 7-Figures with ease.
FBM – Fulfillment by Merchant means that you have to store, pack and ship your own products. Sounds exiting at first, but trust me it get old very fast. A room full of boxes and shipping supplies, daily trips to the post office, no way to take vacation. No thank you!
Go FBA, you will thank me later!
Understanding Amazon Fees
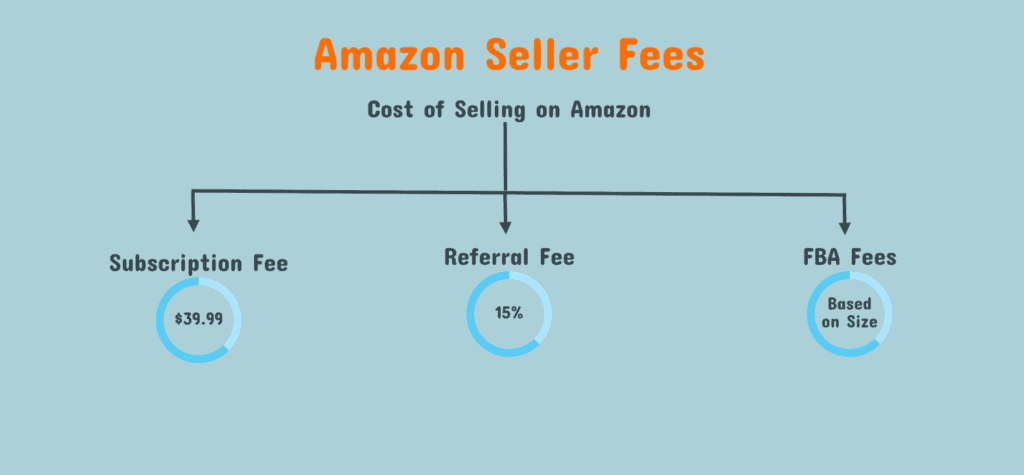
There are 3 Main Costs associated with Selling on Amazon:
- Monthly Subscription
- The Referral Fee
- And the Amazon FBA Fees
Monthly Subscription Fee
As I mentioned previously, there a monthly Fee of $39.99 for your Amazon Professional Account.
This gets deducted from your monthly income, so there is not a lot to worry about here.
The Amazon Referral Fee
This referral fee applies to both FBA and FMB sellers as it’s the Fee Amazon charges for allowing us to sell on the platform.
This fee is a percentage of the total price of the product and is in general 15% for most categories. There are some exceptions such as electronics 8% and Amazon Device Accessories 45%.
Amazon Fulfillment Fees
Amazon Fulfillment Fees can be grouped in 2 categories:
- Pick and Pack
- Storage Fees
Both of these are calculated based on the tier of your product, as well as size and weight. In general expect these fees to be $3 – $15.
For a exhaustive explanation of Amazon Fees you can visit their Fee Schedule.
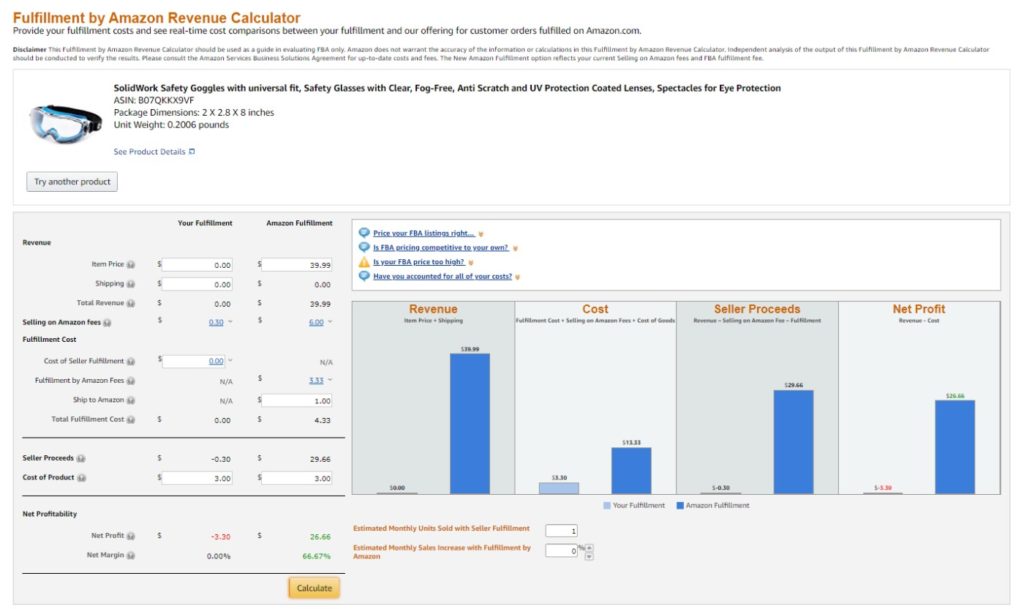
Amazon also makes it easy to calculate all your fees, Profits and Margins using the FBA Revenue Calculator.
To use the calculator, search for product similar to what you are trying to sell (in the same category and about the same size).
Next, enter the item price (your Amazon sale price), the cost to ship to Amazon (approximate) and the Cost of the Product (what you would pay your Manufacturer to make it).
After you press calculate, Amazon will calculate the fees and give you your Net Profit and Margin.
How to Find Products to Sell on Amazon
Now that we have a better understanding of Amazon product Tiers and Fees, we can focus on finding a profitable product to sell.
So what is a profitable product? Any product with a Net Margin of 30% or more is considered Profitable. Obviously, the larger the margin the better.
“But what if i’m happy with just 10%” you might say. Well, the calculator does not take in account you business running costs or advertising, so 30% is as low as you want to go.
The Perfect Amazon Product
The perfect product is unlikely to exist, but it’s important that you have some guidelines so you know what to look for:
- Selling Price: Between $12 – $50
- Small and light preferred
- Has at least 10 sales per day
- It’s not highly seasonal
- It’s easy to transport (does not break easily)
- Minimum 30% profit Margin, 50% is preferred.
- Competing products don’t have more than 150 Reviews
Product Selling Price

Why do we want the price to be $12 to $50?
Well, the cheaper the product, the lower the profit margins, so trying to sell $3 products will be difficult for a beginner, but you can try it if you find something very promising.
And on the other end of the scale, expensive products have high manufacturing cost which will require a larger investment and more risk.
Small and Light
We prefer to have a small and light product so we can easily transport it by air and pay minimum fulfillment fees to Amazon.
Daily Sales
We are interested in products that have at least 10 sales per day. Ideally 30 or more.
This shows that there is interest in the market and people are already buying a product like this.
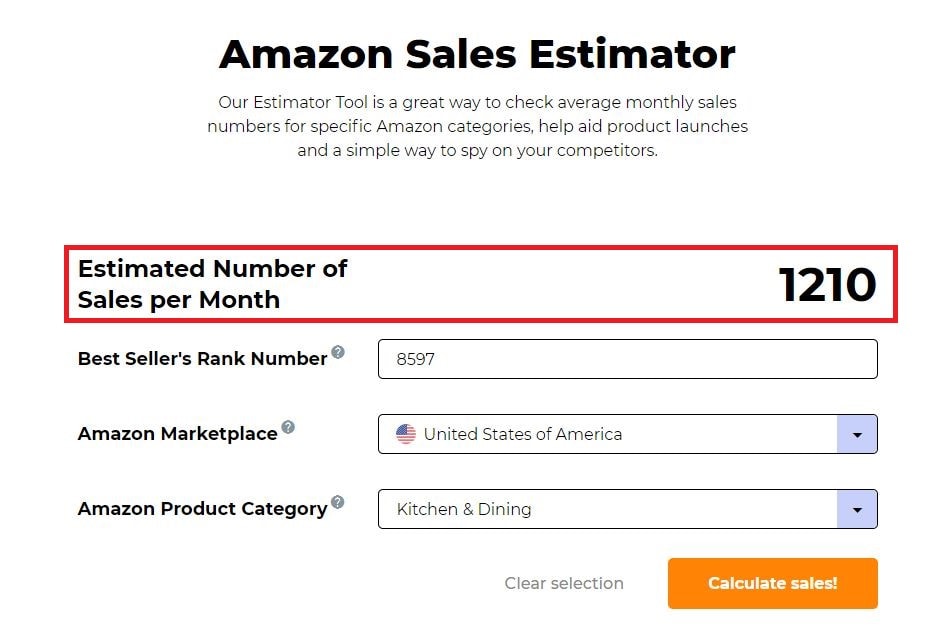
Amazon does not share sales data with anyone, so we will use the product’s BSR (Best Seller Rank, found on the product page) and the Jungle Scout Free Sales Tool to estimate the monthly sales.
Amazon
Jungle Scout

It's not Seasonal
It’s important to make sure your product is not seasonal. Christmas light sell great around the holidays, but you can bet they don’t at all every other time.
We need a product that sells reliably year-round.
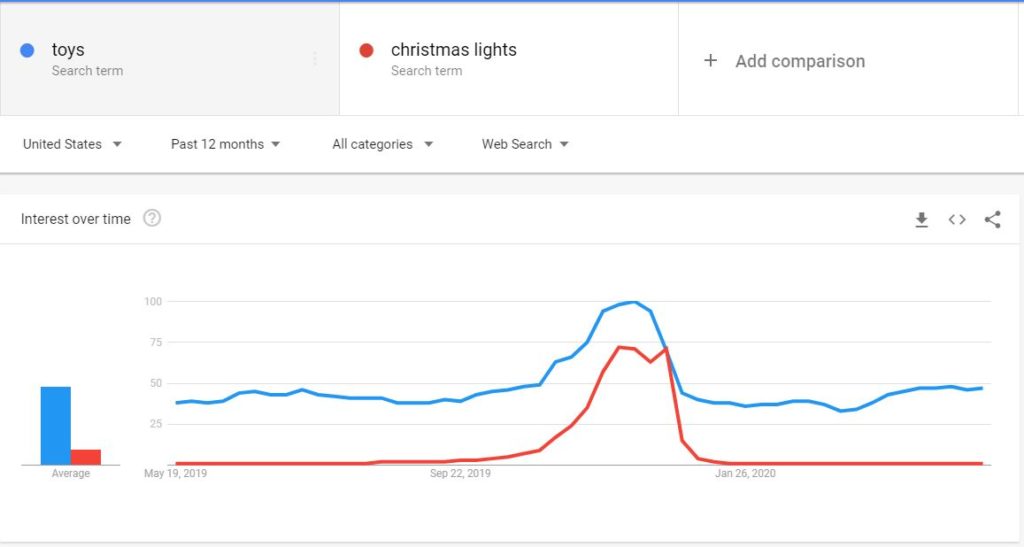
To check seasonality, you can use a tool like Google Trends.
As you can see on the graph below, “toys” have a peak in the December, but also sell year-round. However “Christmas lights” have big sales during December, but no interested in the rest of the year.
Easy to Transport
We want to stay away from products that can break easily, or need special conditions for transportation.
Profit Margins
As we discussed before, we need a minimum of 30% Net Margins in order to pay for our business expenses, adverting and have some money left as profit.
In time, as our product gets established on the market, we will need less and less advertising and our Margins will increase.
Number of Reviews
Just like we used the product BSR to estimate the number of sales, we can use the number of reviews to estimate the competition.
Now, different marketplaces, have different number of reviews on average. For example, a product on the US marketplace will generally have more reviews than a similar product on the German marketplace, because the difference in market size and customer behavior.
Regardless of where you chose to sell, a product with over 150 reviews is considered well established and hard to compete against.
It’s fine if 2 or 3 of the products on page 1 have over 150 reviews, but you don’t want to see the entire page like that.
The ranking itself is also very important. If you can find a product that sells well with poor reviews, then you can take over that nitch by bringing a better product.
Good

Bad

Manual Product Research
I don’t recommend doing product research manually, it takes too much time and effort, and product research is very important, but if you don’t want to invest in search tools, here is where you can look for product ideas:
- Amazons Best Sellers Page
- Amazon’s Deals Page
- Amazon Main Search
- Social Media Platforms
How to Find Product Ideas
You can start your search by getting ideas from the Amazon’s Best Sellers Page.
Go trough the categories on the left and look at what are the top selling products.
When you find a product you are interested in look at the tile and find the main keyword for that product. (ex: “kitchen spatula” or “kitchen towel”).
Use that keyword in the main Amazon search bar and see what results you get.
Analyze the results based on the categories we discussed (price, size, number of reviews etc.) and make a list of potential products to take to the next step.
You can do the same with the Amazon Deals Page.
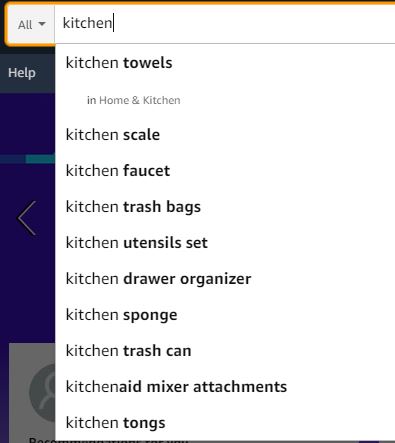
Another source of product ideas is the Main Amazon Search Bar.
You can start typing a word like “kitchen” and the see what results you get.
The order in which they appear is by their ranking in searches by actual customers.
The higher the result, the more searches it has, which means more sales.
Products to Avoid
Now that we have a good idea of a good product, let’s also discuss what Products to Avoid:
- Electrical or complex Mechanical Products – these are awesome, but not for your first product.
- Fragile Products – You will get a lot of refunds and bad reviews, best to avoid.
- Very Large or Heavy Products – The shipping and Fulfillment Fees will destroy your Profit Margins.
- Big Brands with Trademarked or Copyrights – you should never try to sell or even compete against products like this.
- Products in Restricted Categories. You can find a list HERE.
Product Research Using Tools
The Best and most Accurate tool we use is still Jungle Scout.
Save yourself the headache and hassle and get the Web App and Extension. It will make the product research process much faster and enjoyable.
Jungle Scout Product Database
Here is how you can use to Jungle Scout Product Database to find products:
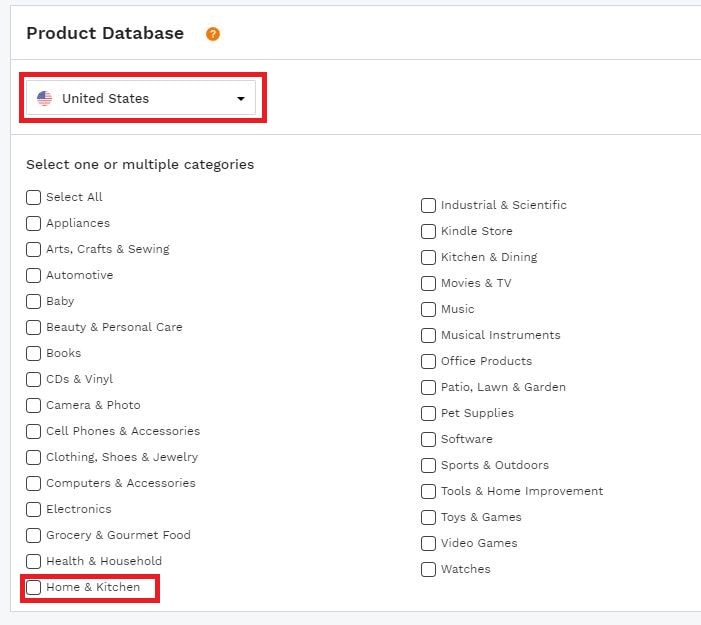
First Select the Marketplace and Category you want to find the products in.
We recommend Selecting one category at a time since we will have to Many Results.
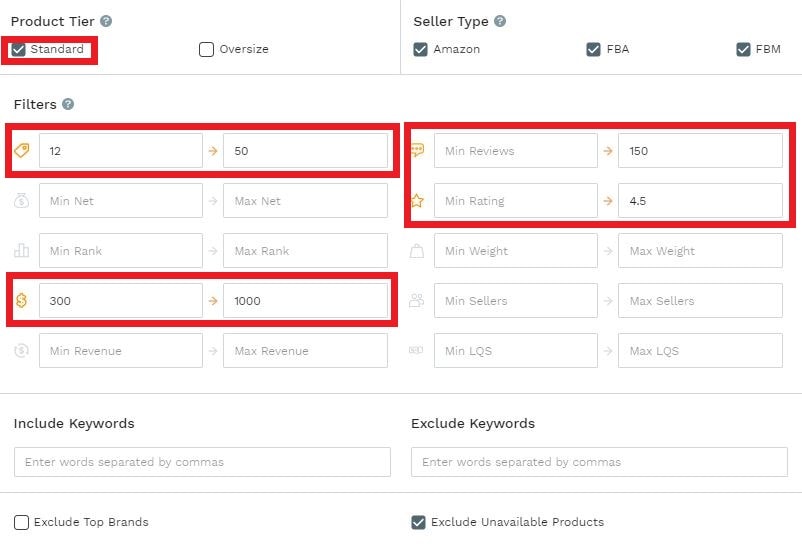
Next, Set your Filters:
- Product Tier
- Sale Price
- Number of Sales
- Number of reviews
- Rating
Add or remove filters as needed depending on the number of results you get.
Make a list of potential products and the main key word where they can found on Amazon. (ex: “kitchen spatula”).
Once you have 10 to 20 products on your list, we can run some Preliminary Numbers to see if they are good opportunities.
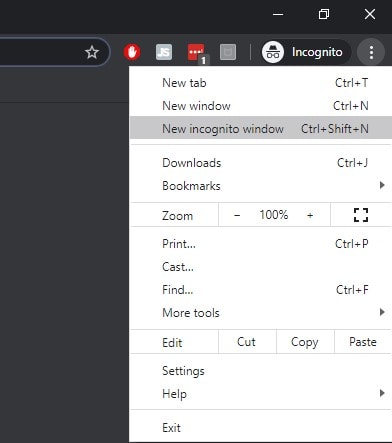
To do this open Amazon.com in an Incognito Tab. We use incognito mode so our previous searches and shopping preferences will not affect our numbers.
Enter the keyword for each product in the search bar and see if the product that appear are similar to the one you found using Jungle Scout. This means that the keyword is correct. If you get mixed results, try a different keyword.
Once the results populate and you run the Jungle Scout Chrome Extension which will open a new window with the numbers for that page.
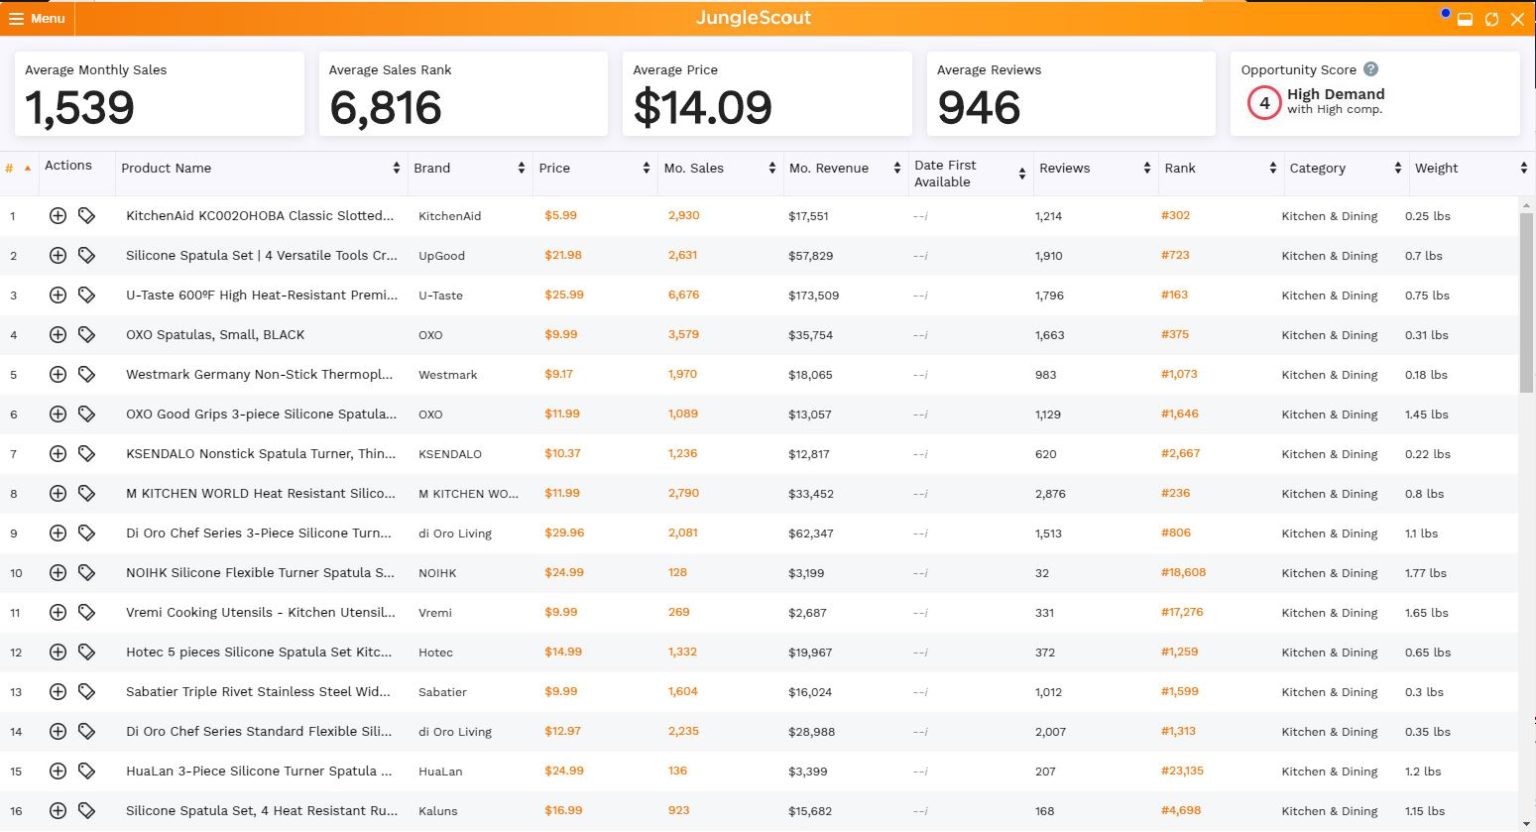
Here you can see the results for the keyword “kitchen spatula” for the US market.
Thing I Like:
- High Demand – Large Monthly Sales
- Small Size – Most Product are less than a lb
Thinks I Don’t Like:
- High Competition – Most Products have over 1000 Reviews
- Big Brands : OxO, Kitchen Aid – Hard to compete Against
The Opportunity Score for this Products is 4, as you can see in the top right corner, so I would pass this one and move to the next product.
Repeat the process until you find a product that has high demand and low competition. If you cannot, go back to the Product Database and try a different category.
Once you find a couple of promising products, we can move on to the next step: Finding a Manufacturer.
Chapter 3:
How to Easily Source Your Products
With our list of potential products, we can start looking for factories that can manufacture it.
Depending on what product you decide, you can look for factories in your country or over-seas.
- Your Country, or the country where you intend to sell – recommended for highly regulated products such as: supplements, beauty products, cosmetics etc. You can find these factories on Google by searching for “product name private label US“.
- Overseas, most common China – recommended for everything else. You can find Factories on Websites like Alibaba or GlobalSources.
Sourcing Products on Alibaba
Alibaba is the worlds largest Supplier Marketplace. The vast majority of Suppliers are from China, but you will also find suppliers from India, Vietnam, United States or Europe.
You can create a free account by clicking the Join Free link at the top of the Page
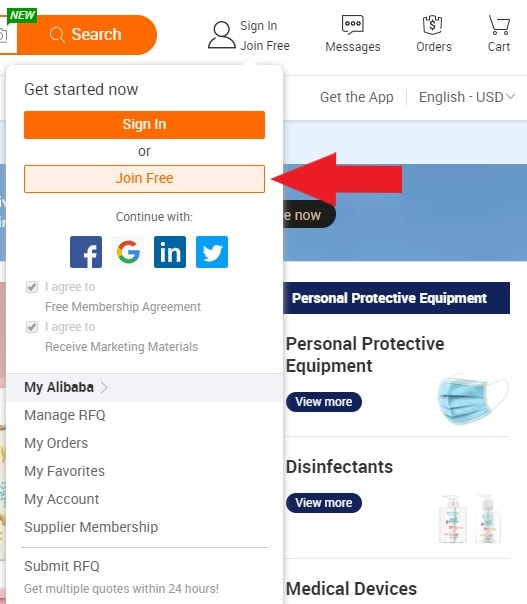
How to Finding Suppliers
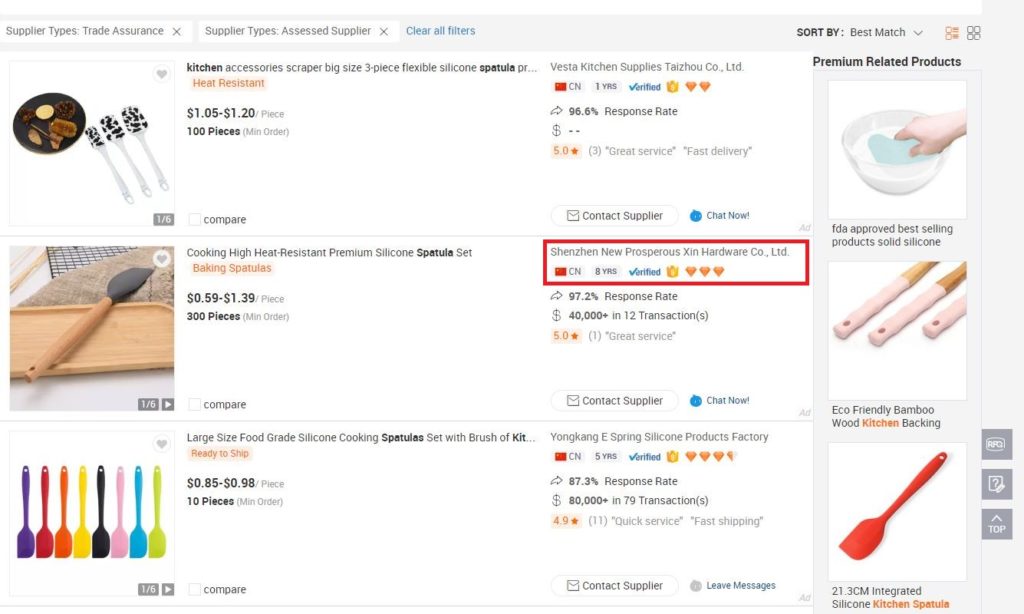
Once your account is created, you can start looking for products.
I searched for “Kitchen Spatula” and these are some of the results I found.
During this process you will also get you estimated Production cost. Please note that many times you will see a price range, choose the higher price. Usually the low price is for very large orders. In the case of the spatula, i’m confident i can manufacture it for about $1.50, including packaging. You will use this number to calculate your profit margins using the FBA calculator we discussed earlier.
When deciding which suppliers to start requesting quotes from, you should be on the look out for a couple of things:
- Number of years in business – anything over 3 Years is fine.
- Verified Supplier – You want to ensure they have the blue Verified check.
- Accepts Trade Assurance – You want to see that they have the Orange Shield.
The first 2 conditions are self-explanatory, but what is Trade Assurance?
Trade Assurance is an Alibaba Payment systems that protects you from fraud or low quality products. Make sure to always use it, especially in the beginning. Do not use Direct Transfer or Western Union when paying Chinese suppliers.
PayPal is also a good payment method, but usually reserved for small amount such as samples due to high fees.
How to Correctly Contact Suppliers
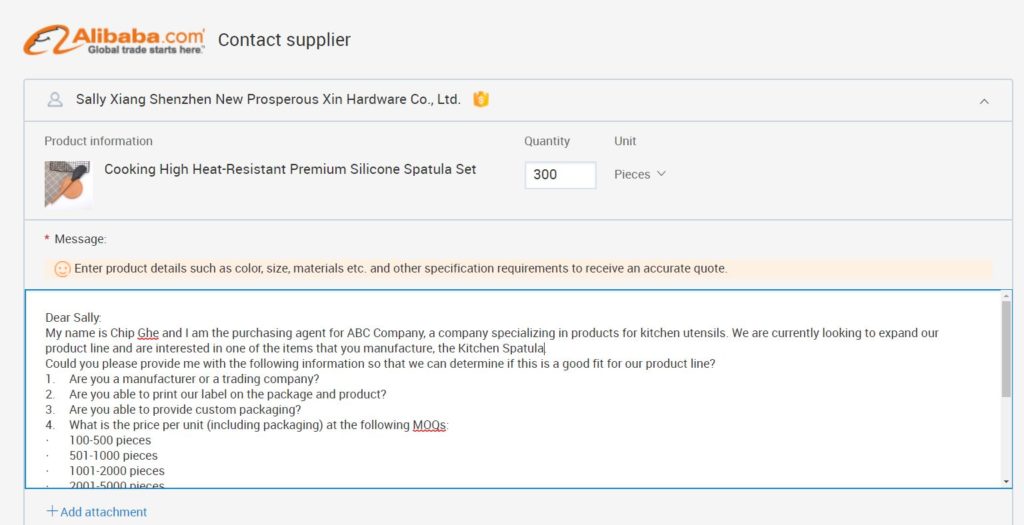
Here is the Template I usually use when contacting Suppliers:
Dear [Contact Name and Manufacturer]:
My name is [your full name] and I am the purchasing agent for [company name], a company specializing in products for [insert your industry or area of interest here]. We are currently looking to expand our product line and are interested in one of the items that you manufacture, the [insert product name and Alibaba product listing link here].
Could you please provide me with the following information so that we can determine if this is a good fit for our product line?
- Are you a manufacturer or a trading company?
- Are you able to print our label on the package and product?
- Are you able to provide custom packaging?
- What is the FOB price per unit (including packaging) at the following MOQs:
- 100-500 pieces
- 501-1000 pieces
- 1001-2000 pieces
- 2001-5000 pieces
- What is your standard production time for each order?
- Do you offer Trade Assurance?
- How many items usually come in a case?
- What are the case dimensions and weight?
I appreciate your time and look forward to hearing from you soon.
Regards,
Name, Title
Company
Understanding Trading Terminology
Before we move further, I want to Discuss some acronyms you will encounter when communicating with suppliers.
MOQ – Minimum Order Quantity. The minimum amount the factory is willing to manufacture at a time. If their MOQ is 5000, move on to the next one.
Shipping Terms, also know as Inco-Terms:
- FOB – Free on Board – This Means that the supplier will be responsible to take the goods to the port and load them on the ship.
- EXW – Ex-Works – This means that You are responsible to pick up the cargo from the Factory.
You always want to get the negotiate on the FOB price, do not accept EXW, shipping in China can get expensive if you don’t know what your are doing.
Payment Terms: 30% Down payment, 70% after Inspection is Approved. Do not pay your supplier all the money from the begining.
- T/T – Bank Wire Transfer
- Trade Assurance – Preferred and Recommended Payment Method.
Invoices:
- PI – Proforma Invoice – Initial Invoice, when placing the Order.
- CI – Commercial Invoice – Final Invoice needed for Importing and Customs.
How to get the Best Deal by Negotiating with Suppliers

You should contact 5 to 10 suppliers for each product you are interested in selling, but do not negotiate with them from the initial contact.
Wait for them to respond and only negotiate when you are ready to place the order.
Know that suppliers also need to make money and negotiating too hard can result in them using lower quality materials for your product. Try to find a Win-Win Situation.
Ordering Samples
Before you place any order, chose your top supplier and order samples.
Sample can be expensive, but do not skip this step.
It’s ok if you don’t get the product with your logo on it, you are interested in the quality of the product for now. A plain product is fine, or even a product with some else’s logo may arrive.
Placing Your Order the Correct Way
As I mentioned before, make sure you chose the Alibaba Trade Assurance Payment Method, and when placing your order, ask you supplier to create a “Trade Assurance Contract”.
Make sure to include as many details as possible:
- Item Price
- Quantity
- Payment Term: 30% Down, 70% After Inspection Passed
- Size, Shape, Color, Packaging,
- Inco-Terms: FOB (and specify the Port)
- Duration of Manufacturing
- Any other product Specification you may have
This contract can save you if your supplier does not do a good job or tries to scam you. The more details the better.
How a Product Inspection can Help you Avoid a Disaster
Before your Shipment leaves the Factory and you pay the remaining 70%, you will send an Independent Inspection Company to make sure everything is good.
There are several Companies in China that do this, I prefer to use TC-Inspections.
Their prices are the best I found and the services are excellent. Expect to pay about $170 – $200 for the inspection. It’s not cheap, but don’t skip it. We never let a shipment leave a factory without inspections, even after years of working with a manufacturer.
Chapter 4:
Shipping Your Products Fast and Efficient
Shipping your Product can be classified in 2 main categories:
- Local Shipping – When the manufacturer is in the same country
- International Shipping – When the manufacturer is over-seas
Local Shipping is very easy, especially since Amazon has special rates negotiated with shipping partners like UPS and FedEX. You can dispatch a shipment from Seller Central, and it will be picked up from the factory or warehouse.
International Shipping is more complex since it also involves importing, so let’s discuss that in more detail.
International Shipments
The most common shipping route we encounter with Amazon Sellers is from China to the USA and China to Europe.
For this route you have 2 options:
- Air Shipping
- Sea Shipping
If your product is small and light and you have a healthy profit margin, you can ship by air.
Air Shipping can also be split in 2 categories:
- Air Express
- Air Freight
The difference here is in Price and Time of delivery. Both options are very fast, expect 2-3 days for Express and 7-8 days for Freight.
Air Freight will cost you less than Express, but expect both these options to be 7-10x more expensive than Sea Freight.
Fast Air Shipping
If you would like to chose Air Express you can request a quote with:
You can easily request quotes on their websites for Air Express and Freight.
When using Air Shipping the company will also take care of the import process, which makes it very convenient.
Once you have the shipping price, divide it by the number of items and you get your “per item cost of shipping”.
This is the last piece of information needed to calculate your profit margins with the Amazon FBA Profit Calculator.
Enter the Item Price (at which you want to sell), then enter the Ship to Amazon (per item shipping cost calculated above), and finally the Cost of Product (received after contacting suppliers). If your margins are over 30%, you can proceed with Ordering and shipping by air.
If your margins are not above 30%, then we can look into shipping by sea.
Efficient Sea Freight
Sea Freight is slower and more complicated than air freight, but much cheaper, especially for larger and heavier products.
Here is what you should know about Sea Freight:
Booking Shipments
Your supplier might offer to book shipping for your, but I would stay away from it. I prefer to use specialized Freight Forwarders that do this every day.
When booking shipments, pay attention to what the quote includes. Some companies may offer only the shipping cost, but there are many other fees such as Port Fees, Pull Fees and others that I have no idea know what they mean.
Filing ISF
If you are shipping to the US, you have to File an document called the ISF that tells the US customs what items you are about to bring into the country. This document must be files 24h before the ship leaves the port or you can face a fine. It’s complicated and can cause issues, so make sure you use a Full Service Forwarder that will file the ISF for you.
Customs and Importing
In order to be allowed to bring a product into a country, it must first pass Customs and then pay the Tariffs (if any apply). For this you will need an Import Broker and a Customs Bond. This process is even more complicated, but thankfully your Forwarder can help you with this as well.
Palatalizing and Prepping for Amazon
In most cases, products are shipped “Lose Cargo” because it is the most cost effective way, which means boxes are placed directly in a container.
In order for them to be sent to Amazon, they need to be placed in a Box or on a Pallet, and then wrapped and labeled. Your Forwarder will come to the rescue again with this process as well, but make sure you let them know from the beginning that they need to Prep the shipment.
Shipping by Sea is Complicated
So by now you can see that shipping by sea is more complicated, but done right, it can be very profitable.
So how do you do it right? Use a Full Service Freight Forwarder like Freightos, Flexport or Shapiro.
I prefer to use Freightos because it’s super easy and fast to get a shipping estimate and have the best prices I’ve found so far. And they ship by sea and by air.
PRO Tip: If you are running out of stock and need to replenish fast, ship 20% of the units by Air and the other 80% by sea. This will allow you to save cost and also restock the products fast.
How to Request a Quote with Freightos
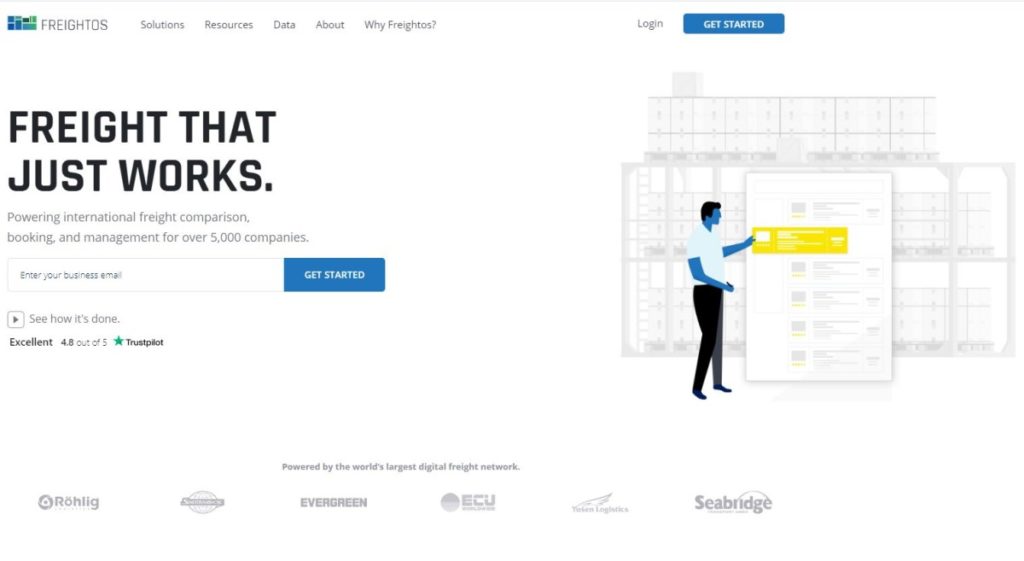
First, go to the Frightos Website and create a free account by entering your email address and then click “Get Started“.
Go trough the steps to enter your information and once complete, we can request a quote on the online tool.
When shipping from over-seas, you can chose 2 routes:
- Supplier to Amazon Direct
- Supplier to You and then Amazon
For your first shipment, I recommend Option 2. Besides the inspection in China, you should manually inspect your first shipment to ensure everything is good. This will also be a good opportunity to keep a few products for friends and family and to take pictures.
Once you are happy with the product, you can send the second shipment directly to Amazon, but remember to inspect the goods at the factory before they leave.
Shipping to Amazon Directly
Once you log in, start a new search.
First, click the yellow “Ship to Amazon Button” .
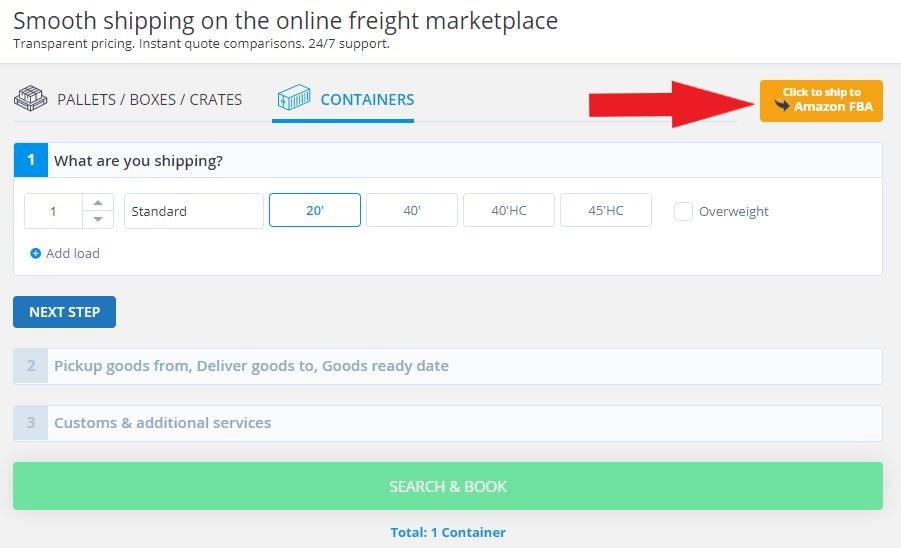
Select “Pallets, Boxes, Crates” and enter the number of Boxes and the Dimensions.
Please note that these are the Shipping Boxes, also know as Shipping Cartons, not the individual Unit Boxes.
You supplier will pack your products in Larger Shipping Cartons to keep them protected and give you the Size and Weight (we requested this info with our first quote).
Also make sure you select the correct Measurements System (Metric or Imperial) depending on where you factory is located.

In the Next Step, Select the Appropriate Amazon FBA Packing Requirements. I usually have the Freight Forwarder label the Boxes and Pallets.
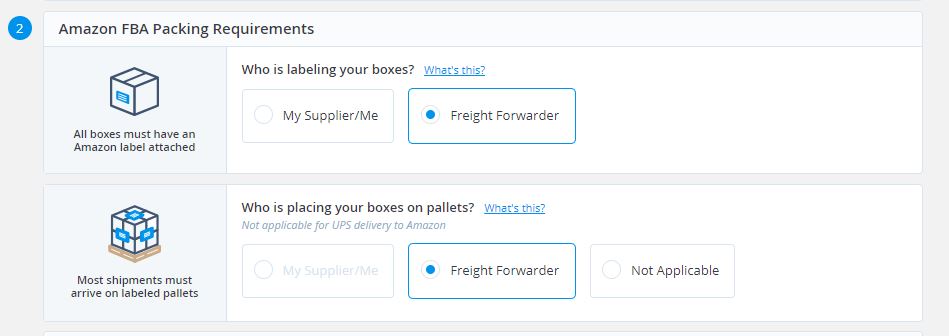
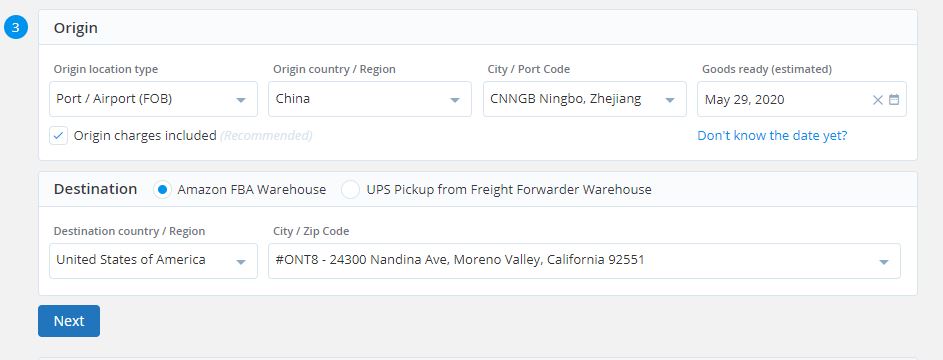
Next we will have to enter the Origin and Destination of the Shipment.
The Origin will be the Port that the supplier provide if buying FOB or the Factory Address if you are buying EXW. Remember, I always recommend FOB.
The destination will be the Amazon Warehouse where the shipment will be delivered. This address is provided by Amazon when we will create the Inbound Shipment in Seller Central, but for the purposes of getting a Quote, use a Main City with a big Port. For Example, if shipping from China, use Los Angeles. (I chose ONT8 which is the Amazon Warehouse I always get when shipping to the West Coast).
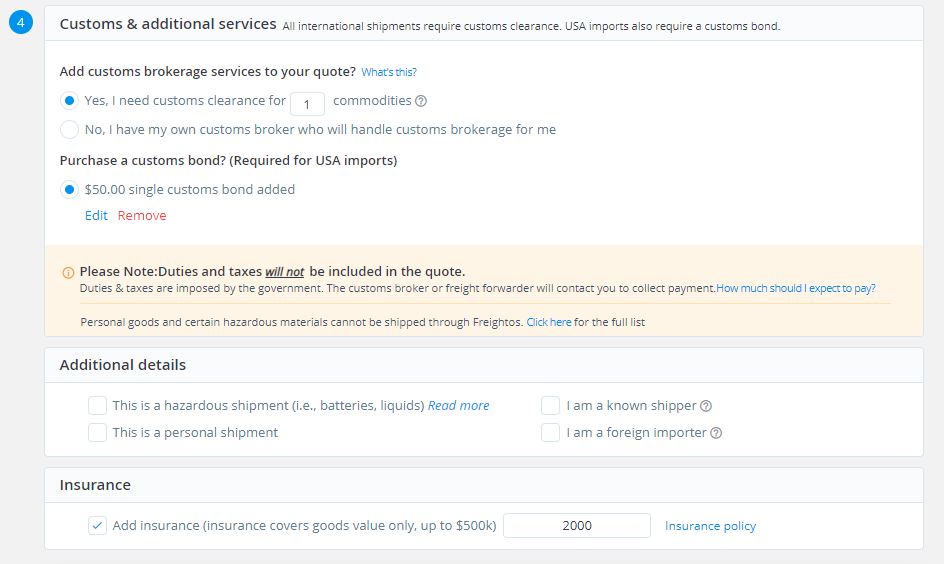
The Final Step is to Setup the Customs and Additional Services Needed.
Here we will select “Yes” we will need them to handle Customs Clarence.
And also “Yes” for them purchase the Import Bond for us. (unless you already have one). If you are just starting importing, select the “Single Bong” option. Once you start importing on a regular basis, a Continuous Bond might be a better alternative.
Once done, Click the Search and Book Button.
The tool will give us several options, for quickest and best value. Depending on the price difference, select the one you prefer.
I chose the Best Value option in this case since the cost was $403, vs the quicker options which was $585, but only slightly faster by a few days.
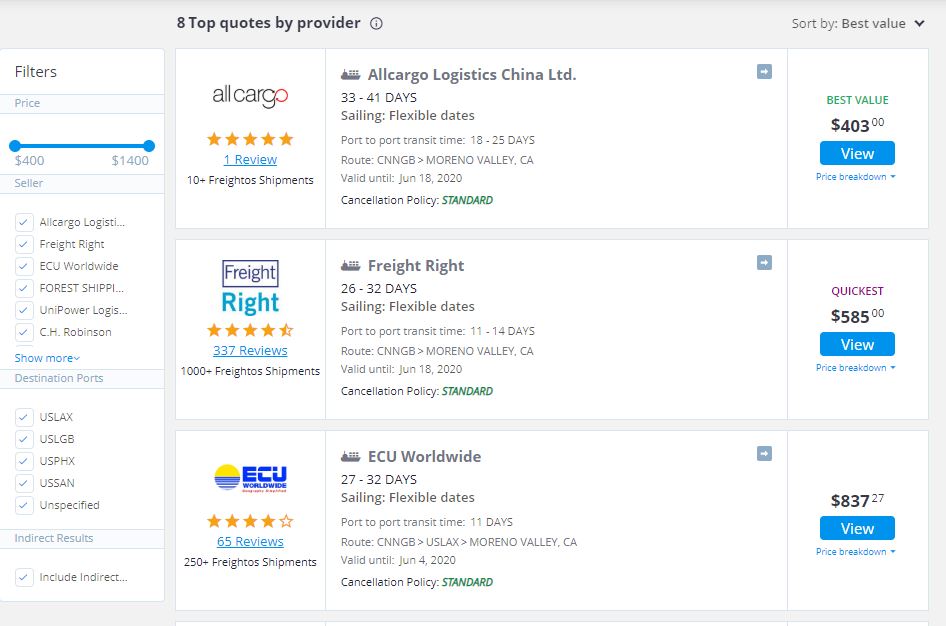
Do not book this shipment yet, we will do it later.
This price does not include the Customs Tariffs, which are different depending on what you are importing. My products are on average 5% of the manufacturing price, you can use that as an approximate cost.
Since I ordered 500 Units, I can calculate the shipping to Amazon Price here as well.
$2000 x 0.05 = $100 (customs duty)
$403 + $100 = $503 (Total Cost).
Which brings my shipping cost to about $1 per Unit.
Take this number and add it in the Amazon FBA Calculator again and run the numbers.
If you Profit Margins are above 30%, then you can proceed, if not, we will look for another product.
Shipping to your House
If you chose to ship to your House for inspection first, the process is the same, just don’t click the “Ship to Amazon” button and enter you House as the destination address.
Chapter 5:
Creating an Eye-Catching Amazon Product Listing
Next, we will discuss how to Create your Amazon Product Listing.
Since we will sell a New, Private Label Product, we will create the listing from Scratch.
The main Elements of a product listing are:
- Name
- Bullet Points
- Pictures
- Description
- Back-end Keywords
Product Listing Requirements
It’s usually best if we have everything ready before we create the product listing, so let’s discuss what we need.
As with everything in business, you have 2 Choices Here:
- Do it Yourself
- Hire a Professional
I know what you are thinking, “Hire a Professional? You are mad! That’s super expensive!”
Not necessarily, there are ways to get professional work done with a small budget.
Enter our Best Friend for finding Freelances, FIVERR.
Fiverr is a website where you can find all kinds of digital work for cheap. Gigs, as they are called can start at $5 and go up from there.
Product Listing - Title, Bullet Points, Description, Back-end Keywords
Creating your Product Listing is very important. Everything is tied to the Amazon A9 Search Algorithm (the computer brain behind the Amazon Search Rankings).
Each of the elements contribute to your product being discovered, ranking, customers clicking on the listing and ultimately buying the product.
So what is my recommendation? Pay someone on fiver to create the Listing for you. A service like this will cost $50 – $130.
If you decide to go this route, go to Fiverr and search for Amazon Listing Writing. From the results, pick someone that has good reviews and pick the Gig that gives you everything you need: Title, Bullet Points, Description and Back-end Keywords.
Give your writer information about your product, as well as a few competitors on Amazon so they can do Keyword Research Based on what they are currently ranking for.
If your budget does not allow for hiring someone, you can create the listing your self.
Creating an Eye Catching Product Title
The Product Title has 2 main Roles:
- To Tell the customer what you product is
- To Rank for specific Keywords
The Title is Primarily Responsible to make the customers click on the listing to find out more.
We also need our title to contain the main keywords you are trying to rank for in the order of their importance. But don’t just make a huge title full of keywords that do not make sense to the customer, it has to be easy to read and informative.
Look at your main competitors for inspiration, but don’t copy their Title Exactly.
Bullet-points that Sell
There is space for 5 Bullet Points in your listing, use them all!
The Purpose of the Bullet Points is to Convince the Customer that this is the product they want to buy.
For each one, you will list a feature of your product with a short description.
Example: “Feature – Short Explanation”
The bullet points will also help you rank for keywords, so add as many as you can, but just like the title, make sure they make sense and the sentence is readable.
A Compelling Product Description
The product description has the most generous amount of Space so you can add more information.
Sometimes the customers are not 100% convinced just by reading the Title and Bullet Points so they go to the description. It’s role is to “Seal the Deal” by reassuring the customer they are making the correct purchase.
Here we will briefly review the main features of the product, as well as adding alternative uses for the product, and a call to action at the end:
“Get Yours today by Clicking Add to Cart Now”. – I know it sounds like a bad infomercial but it works.
You can take some inspiration from your Competitors, but don’t copy it exactly.
How Back-end Keywords help you Rank
So what are Back-end Keywords? Well, they are keywords that get added in you amazon listing, for ranking purposes, that are not visible to the customers.
Have you ever seen those Craigslist listings that have a bunch of words at the bottom? It doesn’t look very nice, so Amazon has a place where you can add keywords, that will not confuse the customer, thus they are called Back-end Keywords.
Speaking of Craigslist, have you ever notice how sometimes you are searching for a office chair and find listings for Cars because they added all those keywords at the bottom? Well, the Amazon A9 Algorithm is much smarter than the Craigslist one, and it will not allow that to happen, so don’t do that.
Any keywords you add, both in the Front-End (title, bullet points, description) and back-end, you have to ensure they are relevant. Adding a bunch of irrelevant keywords to your listing will have the opposite result, you will get penalized by the Algorithm and rank lower.
Any keywords that are relevant, but don’t fin anywhere in the front-end can be added in the back-end, but don’t repeat anything. If the keyword is in your title, don’t add in the back-end as well.
The All Important Product Pictures
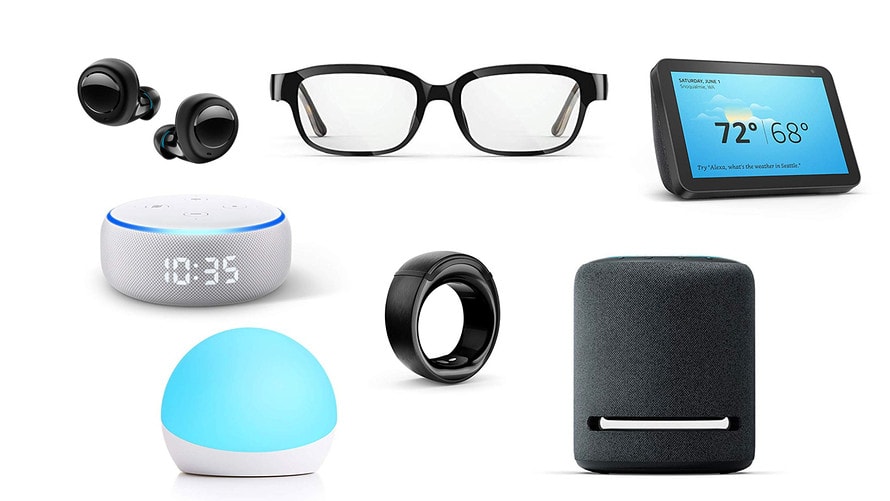
Alongside the Title, the product pictures will be the ones that will attract the customer’s attention and make them click on your listing, so needless to say, they are very important.
There are 9 Picture slots in an Amazon listing, and the first 7 are visible by scrolling. To view the last 2, you have to click on the pictures.
Amazon requires the pictures to be a minimum of 1000 x 1000 pixels, but I recommend 2000 x 2000 for better quality.
The Main Picture should be just the product, on a white background. You cannot add banners, logos, text or anything else.
The rest of the pictures can be lifestyle pictures, contain infographics or anything else.
My recommendation:
- Main Picture – Just the Product, white background
- Pictures 2,3,4 – Details of the product, size and accessories
- Pictures 5,6,7 – Lifestyle pictures showing the product being used.
- Pictures 8 and 9 – Optional, more lifestyle pictures.
As with the rest of the listing, you can chose to take them yourself, or hire someone to do it.
I like to use Fiverr for this process as well. A full set of 7 Edited pictures will cost $100-$150, but it’s well worth it.
I usually search for “Amazon Product Photography” and look for someone in the same country as my factory (in my case in China).
When the production is ready, I ask my supplier to send one product to the photographer, which is cheap (local shipping), and as my products are making their way to the US, the photographer has time to take the pictures.
Product UPC
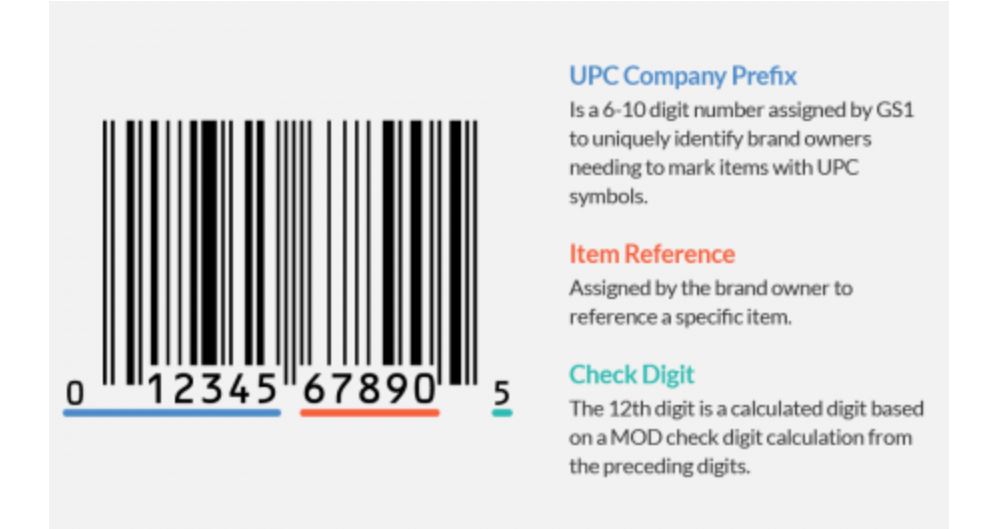
The last item we will need in order to add our product on Amazon is an UPC.
The Universal Product Code (UPC) is the barcode we see on our every day product we buy in stores every day.
So where do we get one? The official Source is GS1. But know that they can be quite pricey.
Thankfully there are other sources like NationWideBarcodes that sell them at much more affordable prices.
You will need 1 UPC for each Product you will be adding, so buy as many as you need.
How to Create the Listing in Seller Central
As I mentioned before, we will be creating a new listing on Amazon for our Product. Here are the Steps:
Add the New Product
Go to SellerCentral and under the Inventory Tab, you will find the Add a Product link.
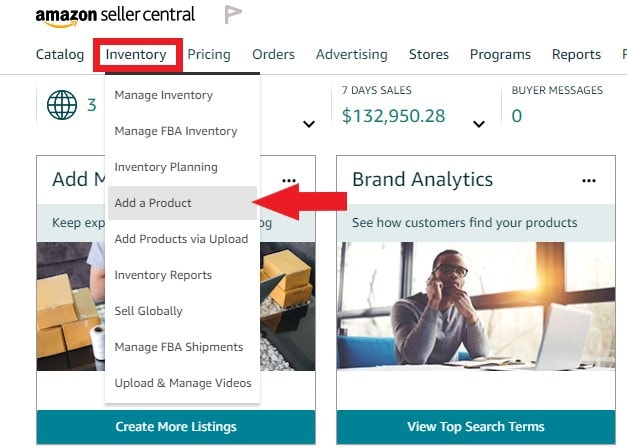
On the next screen, Amazon will ask you to search for the product you want to sell, but since we are adding a new product, select “I’m adding a product not sold on Amazon”.

On the next screen we will chose our Product Category. You can either browse trough the list of categories or use the search box below.
Select your main category and subcategory.
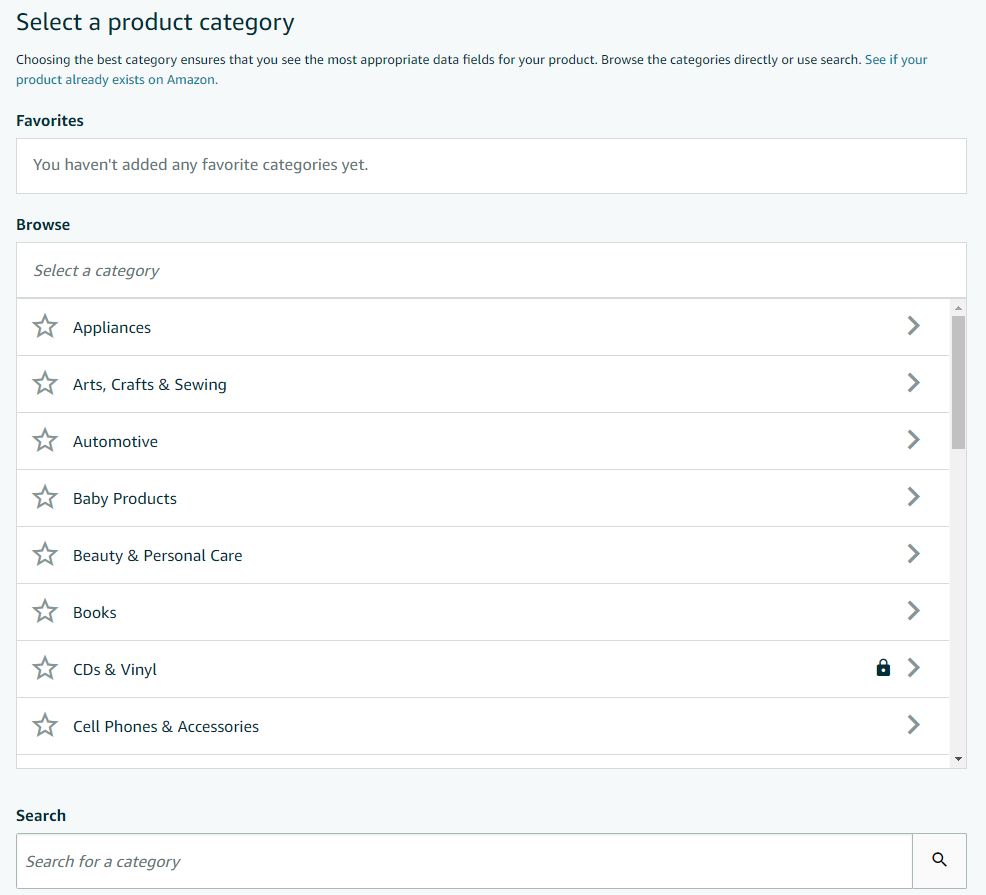
Once you selected the category where you product will be added, we will start filling out the information.
Select the Advanced View toggle to see all the information.
All items marked in red are required in order to save, so that’s why we gathered all the information before starting the process.
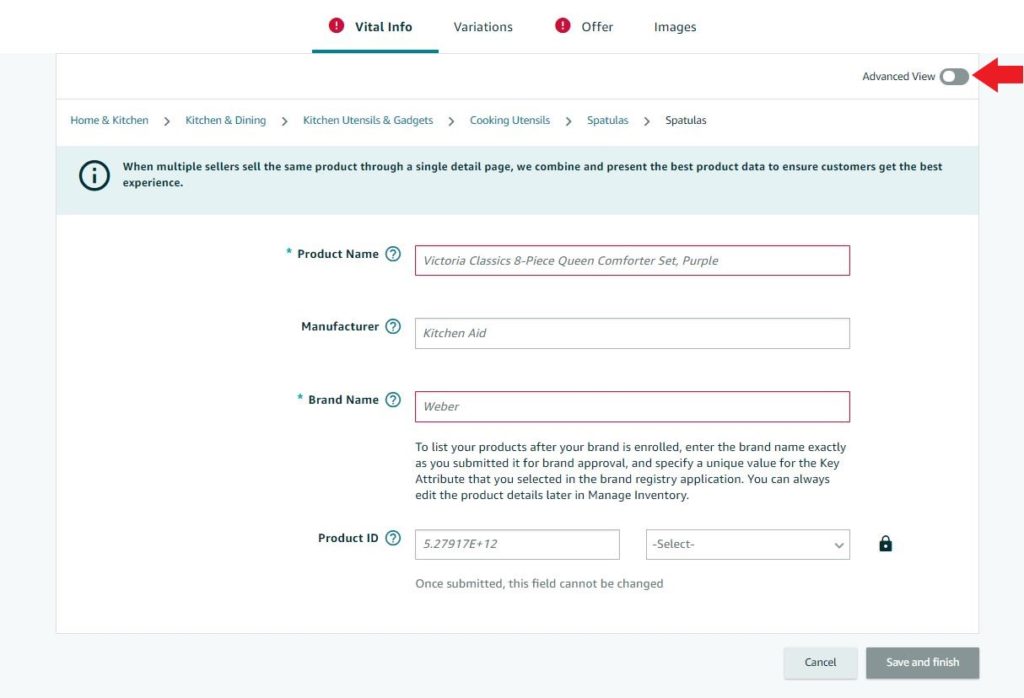
On the Vital Info Tab you will need to fill out the Following:
- Product Name – Your Title
- Manufacturer – Your Brand Name
- Quantity, Color and Size if applicable
- Brand Name – Your Brand Name
- Product ID: The UPC code your purchased and select “UPC” from the drop down next to it.
If you don’t have any Variations such as Size or Color, you can ship that Tab.
In the Offer Tab, Enter the Product Condition: “New” and add the Price.
If you don’t have any Compliance information to add, you can skip this tab.
Next, we will move to the Images Tab, where we will add all our Images. Remember that the Main Image must have a white background.
In the Description Tab we will add our Bullet Points and Product Description. Click the “Add More” link to make all 5 Bullet Points fields visible.
In the Keywords Tab we will add our back-end keywords and target audience if applicable.
And finally, in the More Details Tab we can add our product measurements, shipping weight and all other information that applies.
Once all the information has been added, click Save and Finish. Please note that it can take up to 15 minutes for your listing to be created.
Change your Product to Fulfillment by Amazon (FBA)
To change your product to be Fulfilled by Amazon, go to your inventory tab and click the arrow at the end of the row, then select Change to Fulfillment by Amazon from the Drop-down.
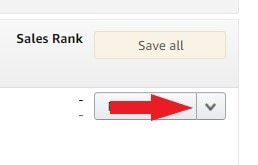
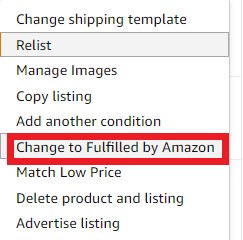
On the next tab, set the Barcode type to “Amazon Barcode” and click Convert Only.

Getting your Amazon Barcode

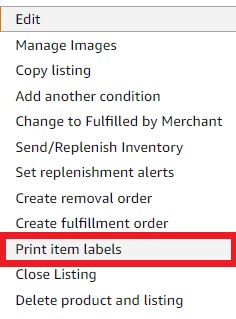
In order to get your Amazon Barcode for your product Packaging, all you have to do is click the arrow next to the Edit Button and Select Print Item Label. This will allow you to download your Amazon Barcode or FNSKU. This Barcode needs to be added on your product packaging in order for Amazon to track it in the Fulfillment Centers. If you don’t print it on your packaging, Amazon will charge your $0.20 per label to add them for your.
So why did we buy the UPC if we are going to use the FNSKU? It’s an annoying legal requirement that we have to respect, otherwise Amazon will suppress our listing.
Creating your FBA Shipment Plan

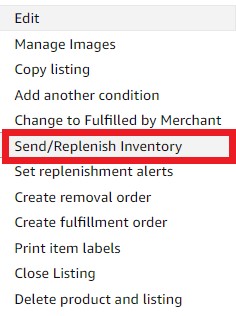
In Order to Send our Products into the Amazon Fulfillment Centers, we need to Create an FBA Shipping Plan.
We will again click the drop-down arrow and select Send/Replenish Inventory.
In the next Page, enter the information about your product such as:
- Where you are shipping from (your supplier or your house)
- How you are going to package the items (individual, or case-packed)
- Size, Weight and Quantity
- Labeling instructions (if they already have the FNSKU or not)
Next Amazon will tell you where to send the shipment to (which Fulfillment Center). Once you know this information, use it when you book the Shipment with your Freight Forwarder.
Working with Shipment Plans
After your Shipment Plan is Created, Click Work on Shipment.

Depending on how you are planning to ship your product, you can chose one of 2 options:
- Amazon Partner Carrier – UPS
- Other Carrier – USPS or your Freight Forwarder
If you are shipping the product to your house and then to Amazon, use Amazon-Partner Carrier.
If your Forwarder is shipping directly to Amazon, Chose Other Carriers – Other.
Note that both options are available for LTL (Less than Truck Load) as well – if you are shipping entire pallets.


Next, select Use Web Form and confirm the Box Configuration.
Once that is ready, you can Generate the Box Labels. These are the labels that go on the Master Cartons. Depending on your shipping method, these are either UPS Labels or FBA Carton Labels. You need to make sure you or your Forwarder applies these before they get deliver to the Amazon Warehouses.
Once everything is ready and printed, you can Complete the Shipment.
Chapter 6:
Launching Your Product to the Top
You made it! Congratulations! Your Product is ready to be Launched on Amazon.
You already added the product and sent it to Amazon, so what launch am I talking about?
Well, Amazon is competitive, I wish it would as simple as adding a product and letting it sell, but unfortunately it’s not anymore.
In this module I will cover what you need to do to ensure your product starts selling and it reaches Page 1.

Preparing for the Launch
After your product has reached the Amazon warehouses and is live, it’s unlikely that it will start selling right away. It will need a few reviews and some advertising to gain traction.
Amazon values reviews more than anything. So how do we get some? Before I answer that, allow me to tell what NOT TO DO.
- Do not use Facebook Reviews Group – These groups are flagged by Amazon and will get your product suppressed or, in extreme cases, you account can be suspended.
- Do not ask you Close Friends or Family members to leave a review, even if they buy the product – this is against the Amazon Terms of Service.
- Do not leave a reviews yourself – this is also against T.O.S.
- Do not pay someone to buy your product and leave you a review or use any website that facilitates this procedure.
- Do not ask a customer to leave a Positive review. The emphases is on Positive, you can ask for a review, but do not mentions 5 Star, Positive or anything else, the review has to be honest.
- Do not ask a customer to remove a negative review or change the star rating. You can reach out to customers and try to fix the issue that prompted the bad review (offer a replacement or refund), but you cannot ask them to change or remove their review.
- Do not email your customers and ask for reviews, you will get your communication privileges suspended.
Ok, that was long list of things not to do, sorry I had to scare you, but Amazon has zero tolerance for anyone who tries to alter customer feedback and reviews.
So what can we do to get reviews? The first 5 are the hardest, the rest will just flow naturally, so focus on getting those. Here are my top techniques:
- Use the Amazon Early Reviewer Program. You can pay $60 and Amazon will give your customers a small monetary reward if they leave a review. You will get 5 reviews with this program. I know, the hypocrisy is real here. We can’t pay anyone for reviews, but we can pay Amazon.
- Use the Amazon Vine Program. You can enroll you product in the Vine Voices Program where you offer your product for free to specially selected reviewers for their honest opinion. This program is great, since it results in very detailed reviews, usually with pictures.
- Ask some friends or acquaintances to buy your product and leave an honest review. This one is right on the line with the rules, so don’t ask you best friends, family or anyone who lives in the same house with you. The further the relationship, the better. Also remember, you cannot ask for Positive feedback and you cannot offer any reward for the review.
- Ask for Reviews using the Integrated Button in your Seller Central. Email Sequences do not work anymore.
- And finally, the best way to get reviews is by Making Lots of Sales, so don’t focus on the limitations, instead focus on selling as many products as you can, the reviews will come.
Amazon Early Review Program

Using the Amazon Early Reviewer Program can help you get your first few reviews and help you product gain traction.
To enroll your product go to Seller Central and under the Advertising Tab, select Early Reviewer Program.
When a customer purchases one of your products, Amazon will send them an email and offer them a $5 gift if they review you product.
The customers are still paying full Price for the product, they only get the incentive after they purchase. “But how can you sell if you don’t have any reviews?” you may ask?
We are running into the chicken and egg problem. We need sales to get reviews, but we need reviews in order to get sales.
So what is the solution?
Amazon PPC Advertizing – or Pay Per Click.
We will run an automatic campaign with a small budget to get our first few sales – more on this in a little bit.
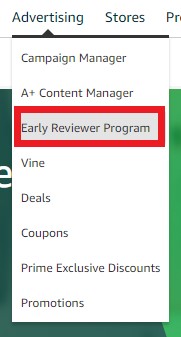
To Enroll into the Early Reviewer Program, simple enter your Product SKU number in the search box and click “Check Eligibility”.
Then simply click Enroll.

Amazon Vine

You can enroll up to 5 Products in the Vine Program, and it’s available for Brand Registered Sellers.
Amazon Vine Voices are vetted and qualified reviewers that will receive your product for free and reviews it in depth. I like the Vine reviews because they are very detailed and most of the time come with pictures so I use it all the time.
The Enrollment process is very similar to the Early Reviews Program. You can find Vine under the Advertising tab.
Amazon's Integrated Reviews Request System
A while back we were allowed to email customers and ask for reviews. And when i say email, i mean the Amazon integrated buyer-seller email system, we don’t actually get the customer’s email address.
But like all good things, some people abused it, and blasted the customers with a million emails and annoyed them enough so now we are not allowed to do that anymore.
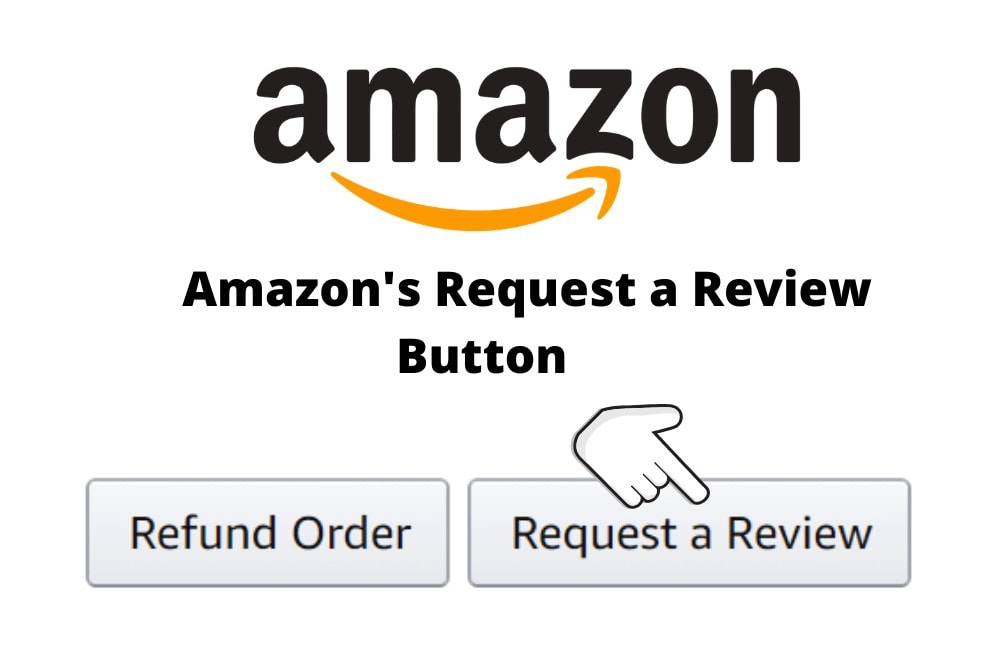
So Amazon introduced the Review Request button that can be found under the order details. We have no control over the message that is being sent and customers who opted out of receiving emails will not get the message, so don’t expect miraculous results.
To find the button, go to Seller Central in the Orders Tab -> Manage Orders.
Select View FBA Order and click on the order number link. You will find the Request Review Button on the Order Details Page.
The good:
- It’s super easy – Press and button and you are done.
- It’s Amazon’s method – We can’t get in trouble.
- It actually works – I’m getting more reviews with this system than with the previous email campaigns.
The Bad: You cannot automate it. You have to open every order one by one and press the button. If you have 100+ order per day, it takes forever. If you have 1000+, forget about it!
There is a solution: Jungle Scout built a bulk request button into their extension. Bless them!
You cannot fully automate it, you have to request 100 reviews at a time, but it’s a million times better than one by one.
To use the Request Reviews feature, simply go to your Order in Seller Central and click the Jungle Scount Extension button to give it access to the page.
Once you grant it access, you will the orange “Request Reviews on this page” Button.
This is how i configure my page display settings:
- Order date (descending)
- 100 (Orders per Page)
- Date Range – Custom: 7 days, one week behind – to give the customers a chance to receive their order and use the product for a couple of days.
Example: if today is the 20th of May, I request reviews from the 6th to the 13th of May.
Once the orders have populated, click the “Request Reviews on this Page Button”.
Continue to Request Reviews even after the Launch, this is something you will need to do daily or weekly.

Amazon PPC Campaigns
What is Amazon PPC? It’s a paid Advertising Campaign that will shows your product at the top of the page when a customer searches for specific keywords.
If there are several Sellers Bidding for a keyword, the one with the highest Bid wins and their Ad gets shown until their budget is exhausted, then the next bid is shown and so on.
There 2 types of Amazon PPC Campaigns:
- Automatic
- Manual
We will start an Automatic Campaign for our product and let Amazon decide on what keywords to bid for and what amount, we only decide the daily Budget.
Once the campaign is running for a while, we will get a keyword report, which will show us which searches converted to sales. Armed with that information we can start a manual campaign as well if we want to, targeting the best performing keywords.
In the beginning, we will only use the Automatic Campaign with a $5 Daily Budget. This will give us a few sales so we can request reviews to get our initial 5 Reviews we need to start our Launch.
Setting up an Automatic Campaign
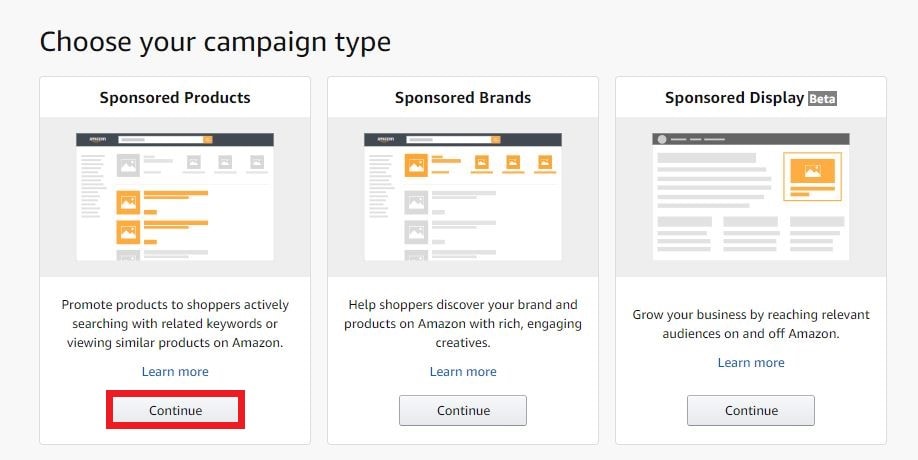
In Seller Central, hover over Advertising and click Campaign Manager.
Next Click the Create Campaign Button and Select the Sponsored Products Campaign type.
For the Campaign Setting:
- Give it a name. I name mine “Automatic Campaign – Product Name“
- Start date: Today, No End Date
- Budget: $5
- Targeting: Automatic
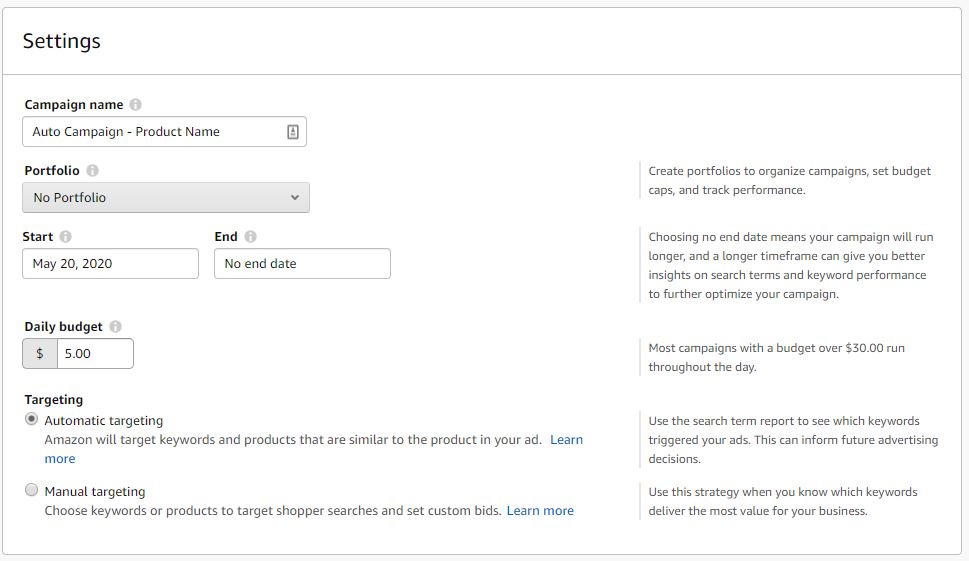
For the Campaign Bidding Strategy, Select Dynamic bids, up and down.
Name your Add Group your Product Name and from the list of products, add your product to the list on the right.
Leave the Default Bid as is (mine is $0.75) and Launch the Campaign.
Remember, our Goal for the Pre-Launch is to get 5 reviews. Once your have them, we can move on to the Actual Launch.
The Perfect Product Launch
Now that we have a few Reviews and Amazon had the chance to Index us on all the important keywords, it’s time to bring our product to page 1.
You can use these 2 promotional methods from our eSA Launch Strategy:
- Facebook Ads
- Amazon PPC
The Power of Facebook Offer Ads
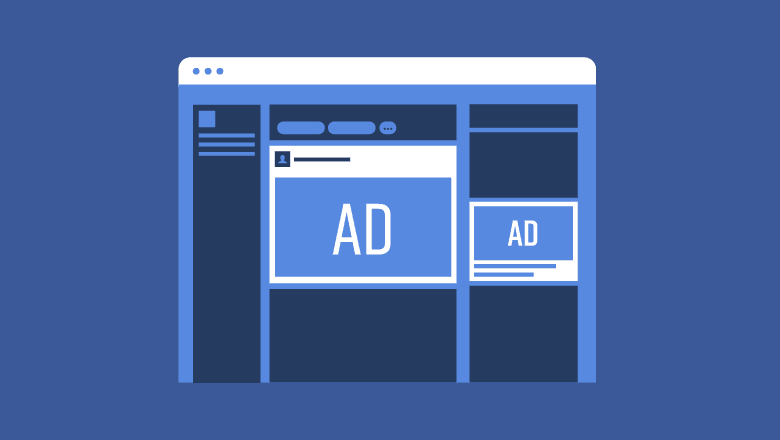
A Facebook Offer Ad is one of the most powerful Tools we have to convince people to buy.
There are many ways to create Facebook Offer Ads, and I could probably write a post just as long as this one on that topic alone, but in essence this is what you should do:
- Create a Facebook ad with a simple, but eye catching picture. I usually use my main product Image with the regular price crossed out, and a bigger Promo Price below it.
- We will use the Amazon Coupon system to offer that promotional price (usually 20 – 40 % off). You can find Coupons in Seller Central under the Advertising Tab.
- In the Facebook Ad, create 7 Ad Sets, each one for 1 day of your launch. The reason we do this is because Facebook will notify everyone that saved the offer when it expires. Each one expires in 1 day so we will get a steady stream of purchases daily, instead of all of them at the same time on day 7.
Why use Facebook Ads? Depending on how you create your audience, they can be cheaper than Amazon PPC, and most importantly, Amazon loves external traffic, especially from premium sources like Facebook, Instagram or Google.
Even if you traffic does not convert to a sale of your product, Amazon will still reward you with ranking because your brought a new Customer on their website.
Running Amazon PPC
We already started our Automatic PPC Campaign since the Pre-Launch, so all we have to do now is bump up the daily budget a little. If you can increase the daily budget to $10, do it, if not, leave it at $5.
Winding Down the Launch
As the 7 day Launch comes to an end, we will steadily wind down our Facebook Ads. I recommend decreasing the budget a little every day, don’t just stop it dead.
Keep an eye on your sales daily, or several times per day. If you are selling well and run the risk of running out of stock, slow down your Facebook ads and Amazon PPC.
Post Launch Action Steps
After your Launch is over and your product is selling steadily here are some thing you should check on a daily or weekly basis depending on how much time you have available:
- Sales and Profits – Amazon has a multitude of reports that can get confusing. I prefer to use a tool like SellerBoard to analyze my Numbers.
- Customer Feedback and Reviews – If you have any bad feedback, contact the customers and see if you can fix the issue. If it’s something not related to you, such a late delivery, you can ask Amazon to remove it.
- Buyer Messages – Some times buyers have questions, or concerns and reach out to you directly. Either via the Q&A section or the Seller-Buyer Messaging system. Respond to them promptly.
- Your inventory levels – to ensure you don’t run our of stock. Reorder when needed. Note that we all run out of stock, especially in the beginning, if it happens, it’s not the end of the world.
Look, selling on Amazon FBA can be complicated, but it’s also very rewarding. If you’re willing to put in the time to learn the process, it will grant you Financial Freedom. This guide is long, but I could not cover everything I wanted to, that’s why I create the Amazon Business Mastery Course where you can learn how to build your Amazon FBA Business Step-by-Step.
Now It's Your Turn
So that’s my guide on how to sell on Amazon FBA in 2024.
Now, I’d like to hear what you have to say:
Are you going to give selling on Amazon a try?
Do you want to grow a business that will replace your current income?
Or are you looking for a side gig to finance some toys or a vacation?
Let me know by leaving a comment below right now.





18 thoughts on “How to Sell on Amazon FBA in 2024: The Ultimate Guide [Step-By-Step]”
Love watching sunset !
Yes! So do I!
Pretty! This was a really wonderful article. Many thanks for providing this information.
Thank you Beth!
Article writing is also a excitement, if you know after that you can write if not it
is complex to write.
Thank you Milla!
Hey there! I just wanted to thank you publicly 🙂 for your help! I saw this blog post (valuable one) some time ago when I was searching for info about the Amazon business. Then I found The Amazon FBA Mastery Course on your site. I saw other courses that were too expensive for me, and others too cheap to consider them good enough. So I decided this one is perfect for me and I was right! I am a newbie in this business and your video lessons are so easy for me to understand! Btw, I’m about to order the samples for my product and I am super excited!
Ps: your support team is great! Thanks!
Thank you Mike!
My spouse and i have been excited when Peter managed to round up his reports because of the ideas he had through your web site. It’s not at all simplistic to just happen to be giving for free guidelines that other people could have been trying to sell. We do know we now have the website owner to be grateful to for this. The most important explanations you made, the straightforward web site navigation, the friendships your site aid to promote – it’s got everything fantastic, and it’s aiding our son in addition to us understand the topic is excellent, and that is seriously important. Many thanks for everything!
Thank you Vernita!
Well-done Chip G.
Thank you very much Waqar!
This is awesome information packed course for a total newbie. It will be of help. Thanks a lot for sharing and goodluck.
Thank you very much Marfie!
All this information helps a lot to better understand what Amazon Business is about and how it works. And i like it because its new 2020 info. Thank you guys! 👍
Thank you very much Jack!
Awesome information and resources. I like this “quick” guide as a great overview of what you guys go over in the course. Keep up the great work!!! 😊
Thank you Kate!